Showing posts with label Virtualization. Show all posts

Howto deploy VM using KVM & kickstart on CentOS/Red Hat - Part 2

Introduction

So far we have been able to deploy a VM using KVM but we need to reply to all the questions the installer will ask us.
As our final objective is to automate the VM deployment, a possible solution is to proceed with a manual installation, selecting the option we would like to replicate in our cluster deployment, and copy the automatically generated kickstart file.

KVM banner

In this post we will show you the steps to automate the tasks and in particular how to manipulate the kickstart file to allow the customization of the partitions.
Let's get started !

Kickstart file

We need to create a kickstart configuration file. The Red Hat documentation provide a good description about kickstart: link.

First of all you should remember the followings:
1) There are 4 important sections:

  • command sections: this section must be the first and it contains something like the "expected question/answer" to all the installation questions.
  • %packages sections: this section should be the second and it includes the list of packages to be installed.
  • %pre %post script sections: these sections contain script to be executed before and after the installation. These sections can be omitted (not required).

2) If you omit some item, the installation may interrupt in a "wait for customer input" mode ... it may be tricky initially to find the right setup but it will be rewarding at the end!
3) Like for Bash scripts, lines which start with a # (pound sign) are treated like comments.

We can start by manipulating the kickstart file that anaconda created when we installed the host OS (se Part1). The file should be located under the root home directory: /root/anaconda-ks.cfg

This is my anaconda-ks.cfg file (depurated of the password hashes !!):

# cat /root/anaconda-ks.cfg

#version=DEVEL
# System authorization information
auth --enableshadow --passalgo=sha512
# Use CDROM installation media
cdrom
# Use text mode install
text
# Run the Setup Agent on first boot
firstboot --enable
ignoredisk --only-use=vda
# Keyboard layouts
keyboard --vckeymap=us --xlayouts=''
# System language
lang en_US.UTF-8

# Network information
network  --bootproto=dhcp --device=eth0 --onboot=off --ipv6=auto --no-activate
network  --hostname=localhost.localdomain

# Root password
rootpw --iscrypted HASHED-PASSWORD
# System services
services --enabled="chronyd"
# Do not configure the X Window System
skipx
# System timezone
timezone Europe/London --isUtc
# System bootloader configuration
bootloader --append=" crashkernel=auto" --location=mbr --boot-drive=vda
autopart --type=lvm
# Partition clearing information
clearpart --all --initlabel --drives=vda

%packages
@core
chrony
kexec-tools

%end

%addon com_redhat_kdump --enable --reserve-mb='auto'

%end

%anaconda
pwpolicy root --minlen=6 --minquality=50 --notstrict --nochanges --notempty
pwpolicy user --minlen=6 --minquality=50 --notstrict --nochanges --notempty
pwpolicy luks --minlen=6 --minquality=50 --notstrict --nochanges --notempty
%end

As you can see the file is pretty easy and self explanatory. When it comes to using the kickstart file to create/install a VM guest, you need to have particular care for the network and the disks/partitions configuration. Then you have the package selection: the difficult part is to satisfy the dependencies.

Let's modify the partition entries ... we want to create our "standard" set of partitions. The boot partition cannot be created on an LVM partition. We will create a swap and a root partition. I like to suggest to create other partitions as well, such as the home and the var partitions as they may grow significantly and you may eventually need to increase the size or move out to a network file system, but this is not the scope of this article.

So this is my partition command list:

# Partition clearing information
clearpart --all --initlabel --drives=vda

####################################
part /boot --fstype ext4 --size=500
part swap --size=1024
part pv.01      --size=1000     --grow  --ondisk=sda
volgroup vg00 pv.01
logvol / --vgname=vg00  --fstype=xfs  --size=10240 --name=lv_root

We start by clearing any existing partitions (clearpart --all --initlabel --drives=vda) on the virtual drive we will use (vda) which we have created with this command (see Part 1 for details):
qemu-img create -f qcow2 /opt/VM/CentOS-server1/guest.qcow2 32768M
Formatting '/opt/VM/CentOS-server1/guest.qcow2', fmt=qcow2 size=34359738368 encryption=off cluster_size=65536 lazy_refcounts=off

Then we provide a list of the partition, indicating the size and type of the filesystem. I didn't use all the space available on the virtual drive (32GB) as I would like to be able to dinamically increase the space of the existing partitions later or create new partitions.

About the %post section, the following is an example of a command you may find useful to modify an entry in a script file.

%post
sed -i 's/ONBOOT=no/ONBOOT=yes/g' /etc/sysconfig/network-scripts/ifcfg-eth0
%end

At the end of the installation you should reboot the guest VM.
This is the complete kickstart file I have been using:

#version=DEVEL
# System authorization information
auth --enableshadow --passalgo=sha512
# Use CDROM installation media
cdrom
# Use text mode install
text
# Run the Setup Agent on first boot
firstboot --enable
ignoredisk --only-use=vda
# Keyboard layouts
keyboard --vckeymap=us --xlayouts=''
# System language
lang en_US.UTF-8

# Network information
network  --bootproto=dhcp --device=eth0 --onboot=off --ipv6=auto --no-activate
network  --hostname=localhost.localdomain

# Root password
rootpw --iscrypted HASHED-PASSWORD
# System services
services --enabled="chronyd"
# Do not configure the X Window System
skipx
# System timezone
timezone Europe/London --isUtc
# System bootloader configuration
bootloader --append=" crashkernel=auto" --location=mbr --boot-drive=vda
# Partition clearing information
clearpart --all --initlabel --drives=vda

####################################
part /boot --fstype ext4 --size=500
part swap --size=1024
part pv.01      --size=1000     --grow  --ondisk=sda
volgroup vg00 pv.01
logvol / --vgname=vg00  --fstype=xfs  --size=10240 --name=lv_root

%post
sed -i 's/ONBOOT=no/ONBOOT=yes/g' /etc/sysconfig/network-scripts/ifcfg-eth0
%end

%packages
@core
chrony
kexec-tools

%end

%addon com_redhat_kdump --enable --reserve-mb='auto'

%end

%anaconda
pwpolicy root --minlen=6 --minquality=50 --notstrict --nochanges --notempty
pwpolicy user --minlen=6 --minquality=50 --notstrict --nochanges --notempty
pwpolicy luks --minlen=6 --minquality=50 --notstrict --nochanges --notempty
%end

Verify the Kickstart file

You can make sure your Kickstart file is valid by using “ksvalidator”.

Install ksvalidator:
# yum install pykickstart

Run ksvalidator on your Kickstart file:
# ksvalidator /path/to/anaconda-ks.cfg

Deploy the VM

As explained along part one, to create and deploy a VM we will use the command virt-install. The additional option for the automation with kickstart file are:
--initrd-inject=/opt/VM/ks.cfg
--extra-args "ks=file:/ks.cfg"
We use the initrd-inject, to tell anaconda to use the kickstart file in the ramdisk. The extra args help anaconda later to "reply" the questions automatically.

This is the command I have tested so far:
# virt-install --name CentOS-LDAP-server --ram 1024 --disk path=./ldap-guest.qcow2,size=32 --vcpus 1 --os-type linux --os-variant centos7.0 --network bridge=virbr0 --nographics --location /opt/VM/CentOS-7-x86_64-DVD-1611.iso --extra-args "console=ttyS0" --initrd-inject=/opt/VM/ks.cfg --extra-args "ks=file:/ks.cfg"

We got our VM created and deployed automatically without any user interation. In the next posts I will explore a basic setup of Ansible in a docker and following, how to deploy VM using Ansible.

Howto deploy VM using KVM & kickstart on CentOS/Red Hat - Part 1

Introduction

This is the first post of a short serie of articles about automation in the deployment of VM guests using Linux as a host server and KVM as platform. The procedure is compatible with CentOS 7.3 / Red Hat Enterprise Linux 7.3 (been tested with CentOS 7.3).

The series will be composed of the following posts as minimum:
  1. General concepts, creating a virtual storage, creating a VM using virt-install
  2. Automate the deployment using kickstart
KVM is the free Virtualization Environment for Linux.is the free Virtualization Environment for Linux.
Kickstart is a tool to automate the installation/deployment of an OS. It will basically "automate" answers to the questions the GUI ask you during the installation phase.

libvirt tools

Let's get started!

Requirements

Minimum host system hardware requirements: Intel VT-x and Intel 64 extensions or AMD-V and AMD64 extensions + an additional core for the guest, RAM and disk space depending on the guest.

To check the CPU on the host:
$ cat /proc/cpuinfo

To build a Virtualization environment on Red Hat you need to install as a minimum the following packages:
qemu-kvm & qemu-img

To check if they are already installed:
$ rpm -qa | grep qemu

To install from the repository:
# yum install qemu-kvm qemu-img

To make your life easier you should also install the following packages:
python-virtinst
libvirt
libvirt-python
libvirt-client

The tool we are going to use the most (virsh) is part of libvirt packages.

In my Lab I have been using a CentOS 7.3 host running on a hardware based on Intel CORE i7vPro CPU with 8GB of RAM. I have installed the above packages (all the set). To make things more "realistic" I used another laptop connected to my Linux host through ssh; similar to an enterprise environment.

Now you need to downloaded the ISO of CentOS 7.3; as you are connected through ssh you need to use a command line tool to download the ISO. I have been using wget.

Then connected to the host as a standard user, I switched to root using su to be able to:
1) create a new directory under /opt called VM:
    # mkdir /opt/VM
2) change the group ownership of the directory so my standard user can work in that directory:
    # chown root:vmusers /opt/VM
3) added my standard user to the group "vmusers":
    # usermod -aG vmusers user-name
   the "G" option is used to set the secondary groups for a user (they have to be comma separated)
   the "a" option allow to append groups: if the user is already part of several groups, you need to use this option to be able to just add the user to a new group without modifying the existing list

Creating the virtual storage

There are several type of storage you can use. We choose qcow2 as it is the standard for KVM virtual machines.
The following command will create a 32GB image which you will be able to use and partition via kickstart and virt-install. 

# qemu-img create -f qcow2 /opt/VM/CentOS-server1/guest.qcow2 32768M
Formatting '/opt/VM/CentOS-server1/guest.qcow2', fmt=qcow2 size=34359738368 encryption=off cluster_size=65536 lazy_refcounts=off

The file created does not use all the 32GB of space but it can grow up to that size:

# ls -l /opt/VM/CentOS-server1/
total 196
-rw-r--r-- 1 root root 197120 Jul 22 18:24 guest.qcow2

Check the host network configuration

When you have the KVM virtual environment working, you should have a network interface called something like virbr0. If you execute the "Network Management CLI" or any other way to get network information (ip addr sho, ifconfig ...) you should get something like this:

# nmcli device show
GENERAL.DEVICE:                         virbr0
GENERAL.TYPE:                           bridge
GENERAL.HWADDR:                         52:54:00:88:4E:4B
GENERAL.MTU:                            1500
GENERAL.STATE:                          100 (connected)
GENERAL.CONNECTION:                     virbr0
GENERAL.CON-PATH:                       /org/freedesktop/NetworkManager/ActiveConnection/1
IP4.ADDRESS[1]:                         192.168.122.1/24
IP4.GATEWAY:
IP6.GATEWAY:

GENERAL.DEVICE:                         enp0s25
GENERAL.TYPE:                           ethernet
GENERAL.HWADDR:                         F0:DE:F1:4C:49:45
GENERAL.MTU:                            1500
GENERAL.STATE:                          100 (connected)
GENERAL.CONNECTION:                     enp0s25
GENERAL.CON-PATH:                       /org/freedesktop/NetworkManager/ActiveConnection/9
WIRED-PROPERTIES.CARRIER:               on
IP4.ADDRESS[1]:                         192.168.0.18/24
IP4.GATEWAY:                            192.168.0.1
IP4.DNS[1]:                             
IP4.DNS[2]:                             
IP6.ADDRESS[1]:                         
IP6.GATEWAY:

These means that you have a virbr0 interface ready to be used for your new VM guest ! If this is not happening ... you need to review your KVM host environment.

Installing the VM

So now you just need to run the following command. It will create a new VM guest, named "CentOS-Server1" with 1GB of RAM, using the qcow2 storage we just created, the network bridge virbr0 and the CentOS ISO file which we downloaded with wget. As we don't was to use VNC but just CLI, we need to set "nographics" and forward the console using the extra-args option.
To run this command you need to move into the folder where you have created the qcow2 storage file.

# virt-install \
--name CentOS-Server1 \
--ram 1024 \
--disk path=./guest.qcow2,size=32 \
--vcpus 1 \
--os-type linux \
--os-variant centos7.0 \
--network bridge=virbr0 \
--nographics \
--location /opt/VM/CentOS-7-x86_64-DVD-1611.iso \
--extra-args "console=ttyS0"

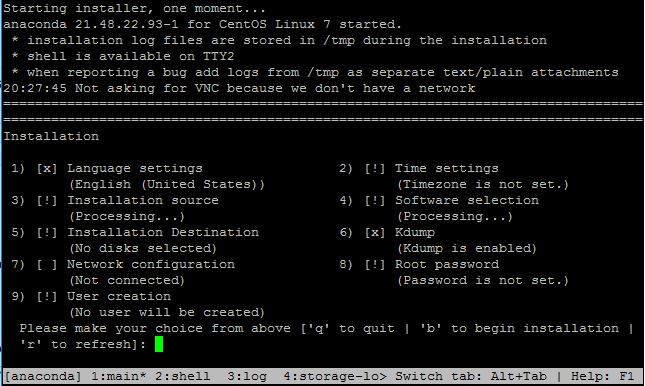
The installation will start and you will be prompted for several questions:


You need to complete the steps which have an esclamation mark in it. And then proceed with the installation.
Remember, the scope of this test is just create the baseline for your kickstart configuration file (generated by the anaconda installer during the setup).


After a minute or two you will have your VM created. We now need to start and connect to it !

Testing your VM

Just hit Enter and the jus created VM will reboot. Login and type df -h to check the disks and ip addr show to check the network configuration.
This is my just created kickstart file (I left the hashed password of root as this is just a lab):

# cat anaconda-ks.cfg
#version=DEVEL
# System authorization information
auth --enableshadow --passalgo=sha512
# Use CDROM installation media
cdrom
# Use text mode install
text
# Run the Setup Agent on first boot
firstboot --enable
ignoredisk --only-use=vda
# Keyboard layouts
keyboard --vckeymap=us --xlayouts=''
# System language
lang en_US.UTF-8

# Network information
network  --bootproto=dhcp --device=eth0 --onboot=off --ipv6=auto --no-activate
network  --hostname=localhost.localdomain

# Root password
rootpw --iscrypted $6$f8wdfFwzzYkMM4st$yA16u58XLpN/tGOYAfQ0VHgBUkgGHCGXV3xQiFAzYcv.7JDmsJ0dosOuZRWrzq7TSyLDG.sD9iSLFwcLIohnB0
# System services
services --enabled="chronyd"
# Do not configure the X Window System
skipx
# System timezone
timezone Europe/London --isUtc
# System bootloader configuration
bootloader --append=" crashkernel=auto" --location=mbr --boot-drive=vda
autopart --type=lvm
# Partition clearing information
clearpart --all --initlabel --drives=vda

%packages
@core
chrony
kexec-tools

%end

%addon com_redhat_kdump --enable --reserve-mb='auto'

%end

%anaconda
pwpolicy root --minlen=6 --minquality=50 --notstrict --nochanges --notempty
pwpolicy user --minlen=6 --minquality=50 --notstrict --nochanges --notempty
pwpolicy luks --minlen=6 --minquality=50 --notstrict --nochanges --notempty
%end

Troubleshooting your VM

I have been playing "too much" with the network configuration of the host months ago ... removing the Network Manager, manually configuring the WiFi and later re-installing the Network Manager ... the results are that I have the virbr0 bridge listed in my host network interface but when I start my guest it does not seems to work (cable disconnected).
The interface virbr0 is configured through virsh. Three are the commands you need to remember:

stop network:
# virsh net-destroy default

start it:
# virsh net-start default

edit the default.xml file in the right way (locking the file so you are the only user which is effectively manipulating the file):
# virsh net-edit default

My file look like this:
# cat /etc/libvirt/qemu/networks/default.xml
<!--
WARNING: THIS IS AN AUTO-GENERATED FILE. CHANGES TO IT ARE LIKELY TO BE
OVERWRITTEN AND LOST. Changes to this xml configuration should be made using:
  virsh net-edit default
or other application using the libvirt API.
-->

<network>
  <name>default</name>
  <uuid>cd61f19c-de54-41ff-bb09-94089f52fe1d</uuid>
  <forward mode='nat'/>
  <bridge name='virbr0' stp='on' delay='0'/>
  <mac address='52:54:00:88:4e:4b'/>
  <ip address='192.168.122.1' netmask='255.255.255.0'>
    <dhcp>
      <range start='192.168.122.2' end='192.168.122.254'/>
    </dhcp>
  </ip>
</network>

I don't see any here ... so let's move inside the guest and check how the network card is configured.

So as I did power off my VM before, now I need to start it again. Let's have a look at my VM (the inactive VMs):

# virsh list --inactive
 Id    Name                           State
----------------------------------------------------
 -     CentOS-Server1                 shut off
 -     Kali                           shut off

To check if the network is active:

# virsh net-list
 Name                 State      Autostart     Persistent
----------------------------------------------------------
 default              active     yes           yes

You cannot connect to an "inactive" (powered-off guest), you need first to start it (power-on):

# virsh start CentOS-Server1
Domain CentOS-Server1 started

Now that it is powerd on you can open it's serial console (it is like if the host is connected to the serial console of the guest):

# virsh console CentOS-Server1
Connected to domain CentOS-Server1
Escape character is ^]

CentOS Linux 7 (Core)
Kernel 3.10.0-514.el7.x86_64 on an x86_64

localhost login: root
Password:
Last login: Sat Jul 22 21:47:50 on ttyS0

As you may see, you can jump back to the host using the Escape character ^] ( which is CTRL-] )

So back to the original issue ... the network! The virbr0 interface seems to be configured correctly but if I check the guest network configuration I got this:

# ip addr
1: lo: <LOOPBACK,UP,LOWER_UP> mtu 65536 qdisc noqueue state UNKNOWN qlen 1
    link/loopback 00:00:00:00:00:00 brd 00:00:00:00:00:00
    inet 127.0.0.1/8 scope host lo
       valid_lft forever preferred_lft forever
    inet6 ::1/128 scope host
       valid_lft forever preferred_lft forever
2: eth0: <BROADCAST,MULTICAST,UP,LOWER_UP> mtu 1500 qdisc pfifo_fast state UP qlen 1000
    link/ether 52:54:00:75:69:70 brd ff:ff:ff:ff:ff:ff

As you can see, there is something wrong: eth0 does not have any IP associated

So let's have a look to what Network Manager suggest:

# nmcli
eth0: disconnected
        "Red Hat Virtio network device"
        1 connection available
        ethernet (virtio_net), 52:54:00:75:69:70, hw, mtu 1500

lo: unmanaged
        loopback (unknown), 00:00:00:00:00:00, sw, mtu 65536

Use "nmcli device show" to get complete information about known devices and
"nmcli connection show" to get an overview on active connection profiles.

Consult nmcli(1) and nmcli-examples(5) manual pages for complete usage details.

So at the moment the state shows as "disconnected" ... what to do now?

# nmcli device show
GENERAL.DEVICE:                         eth0
GENERAL.TYPE:                           ethernet
GENERAL.HWADDR:                         52:54:00:75:69:70
GENERAL.MTU:                            1500
GENERAL.STATE:                          30 (disconnected)
GENERAL.CONNECTION:                     --
GENERAL.CON-PATH:                       --
WIRED-PROPERTIES.CARRIER:               on

# nmcli connection show
NAME  UUID                                  TYPE            DEVICE
eth0  65c3d95b-9ff4-480b-954c-63248335cef5  802-3-ethernet  --

As everything seems to be correct, I normally have a look to the configuration files for the interface:

# cat /etc/sysconfig/network-scripts/ifcfg-eth0
TYPE=Ethernet
BOOTPROTO=dhcp
DEFROUTE=yes
PEERDNS=yes
PEERROUTES=yes
IPV4_FAILURE_FATAL=no
IPV6INIT=yes
IPV6_AUTOCONF=yes
IPV6_DEFROUTE=yes
IPV6_PEERDNS=yes
IPV6_PEERROUTES=yes
IPV6_FAILURE_FATAL=no
IPV6_ADDR_GEN_MODE=stable-privacy
NAME=eth0
UUID=65c3d95b-9ff4-480b-954c-63248335cef5
DEVICE=eth0
ONBOOT=no

So I guess the issue is that the "ONBOOT" option is set to "no" so the OS is not sending the request to DHCP to get an IP ... let's use nmcli to enable connetion:

# nmcli con up id eth0
Connection successfully activated (D-Bus active path: /org/freedesktop/NetworkManager/ActiveConnection/0)

Let's check if it does work now:

# ip addr
1: lo: <LOOPBACK,UP,LOWER_UP> mtu 65536 qdisc noqueue state UNKNOWN qlen 1
    link/loopback 00:00:00:00:00:00 brd 00:00:00:00:00:00
    inet 127.0.0.1/8 scope host lo
       valid_lft forever preferred_lft forever
    inet6 ::1/128 scope host
       valid_lft forever preferred_lft forever
2: eth0: <BROADCAST,MULTICAST,UP,LOWER_UP> mtu 1500 qdisc pfifo_fast state UP qlen 1000
    link/ether 52:54:00:75:69:70 brd ff:ff:ff:ff:ff:ff
    inet 192.168.122.251/24 brd 192.168.122.255 scope global dynamic eth0
       valid_lft 3588sec preferred_lft 3588sec
    inet6 fe80::d4cf:56f3:675b:221d/64 scope link
       valid_lft forever preferred_lft forever

When you reboot the guest, the interface will not have an IP again (not connected). Let's make it permanent! If you edit the file ifcfg-eth0 you have later to inform the Network Manager to reload the file.

Using vi let's change ONBOOT=no into ONBOOT=yes in the file /etc/sysconfig/network-scripts/ifcfg-eth0.

Then reload the file:

# nmcli con load !$
nmcli con load /etc/sysconfig/network-scripts/ifcfg-eth0

I love the shortcut !$ which repeat the last used argument!

# ip addr
1: lo: <LOOPBACK,UP,LOWER_UP> mtu 65536 qdisc noqueue state UNKNOWN qlen 1
    link/loopback 00:00:00:00:00:00 brd 00:00:00:00:00:00
    inet 127.0.0.1/8 scope host lo
       valid_lft forever preferred_lft forever
    inet6 ::1/128 scope host
       valid_lft forever preferred_lft forever
2: eth0: <BROADCAST,MULTICAST,UP,LOWER_UP> mtu 1500 qdisc pfifo_fast state UP qlen 1000
    link/ether 52:54:00:75:69:70 brd ff:ff:ff:ff:ff:ff
    inet 192.168.122.251/24 brd 192.168.122.255 scope global dynamic eth0
       valid_lft 3590sec preferred_lft 3590sec
    inet6 fe80::d4cf:56f3:675b:221d/64 scope link
       valid_lft forever preferred_lft forever

So, reboot for the last time and check again the network ... done! Issue sorted and learnt some useful nmcli commands!

In the next post of this short serie we will work on the kickstart file to customize both the partitioning of the storage and the network configuration (I want to have the above correction automated during the  guest deployment).

If you enjoyed this post, please follow us and comment!

How to become an hacker !

It is interesting how many times since I started this blog I came into "Cyber security" forum where the predominant questions were:

  1.  How do I become a hacker
  2. Which computer languages do I need to learn?
  3. Which are the steps to become a Security Expert
In this post, I am going to try to answers to these questions. I will open other questions, which I will answer in my following posts.


Let me know your opinion.

Operating Systems

For sure the starting point, if you are green on IT is knowing how a PC works, how it does boot, the BIOS/UEFI, the boot sectors and the different type of partitions and bootloaders.

You should not focus on a specific OS, perhaps at this stage. There are loads of websites that provide free training and free PDF.

Windows 7 & Windows 10

In my opinion, the best way to learn an OS is by installing it on your PC. If you are still "green" than you should start with a "desktop" OS such as Windows 7 or Windows 10.

It is possible to get trial licenses directly from Microsoft. Just create an account, go into the download area and search for trial licenses. The best way is to create an acocunt under "TechNet":


Then you can click on "Downloads", select the OS you wish to try and click on Evaluation. You need to further register but at the end you can download a fully functional ISO which will allow you to install the product and use it without limitation for 90 days... and 90 days are enough to follow a basic/intermediate training (2 weeks) and then do some more advanced "stuff"!!

I am not a Micorsoft "guy" but I can tell you that Technet website is good, with a lot of information.

Now that you have the ISO, you need to find a good training website. For Windows 10 I would suggest to have a look at this tutorial:

Linux

That's my area! Learning Linux is not difficult, especially if you don't have any IT knowledge at all! If otherwise you are a GUI-guy then you should have more problem; but when you will discover the power of Bash ... nothing will stop you anymore.

So, you want to learn Linux; that's come free, forever! Just download a distribution (collection of the OS kernel and free softwares) and install it on your computer.

Now you should be good enough to do an installation within a VM (Virtual Machine). In this way you will be able to mess-up your system as much as you want and restart from a working snapshot.

I am not going to explain you how to create and work with a VM (it is out of the scope of this article), but you can have a look at this link:


Which distribution to use... this is an easy question!! Easy because all the Linux distros are based upon the same Kernel (Linux kernel) and a similar set of tools (utilities). Hence if you want to learn the command line (learn the hard way), any distros is good for you.
You do not need any fancy GUI interface; most of the servers does not use a Graphical User Interface at all.
Perhaps, one of the most used server distribution is RedHat Enterprise Linux (RHEL) so similar distributions maybe the right starting point: CentOS, Scientific Linux, Fedora.
Personally, I use CentOS 7 on my Laptop and on several VM which I use to make tests.

You may find a good training (basic training) at this link:


The Linux Foundation sposnsors it (with a brief video introduction by Linus Torvalds). I followed that training years ago as a refresh of my knowledge, just before starting a position as Tech Support, which required the use of Linux CLI commands. I highly suggest you to follow the training, complete the proposed exercises, and after that search for "The Linux Bible" book. It is a good intermediate level training manual which you can use to increase your knowledge quite a bit.

Networking

If you completed the above steps (which requires you quite some time if you are studying after working hours), you should already have learnt a basic knowledge of Networking. That's not enough if you want to follow the road to Cyber Security Success!!
I followed a 1-year training course in Milan, Italy (eForHum) and got Cisco CCNA certification. That is just an example of training that you need to follow to have a basic knowledge about ISO Layers, IPv4, IPv6, switching and routing protocols and finally Cisco CLI commands.
It has been useful in all my following working experiences, especially now working within a Telco company.
Another good training to follow is the one that brings you to get CompTIA Network+. You may find a good training course if you join Cybrary.it

Computer Languages

Knowing computer languages is possibly the hardest step to achieve in the "growing as an hacker" learning curve.
If you studied Linux, you should have come into Bash and you possibly had some scripting experiences with it. Anyhow, I would suggest you to learn it really well together with the regular expressions (which are used by tools such as grep, awk and sed).
Another language you should be able at least to "read" is Python. If you are going to do reverse engineering of malware, possibly you need to have a background in C/C++ as well.
Any Linux distro provide free environment and IDE to practice these languages. Again the best way to start is by following a basic/intermediate training with loads of Labs ... practice practice practice !!
As suggested by +Mike Barton a good understanding of the Assembly language is quote "very important and not only for reverse engineering but for very tight code".
Perhaps writing good code is something missing in this days!

Continuous Learning

To complete the post, I would like to suggest the beginner (and the expert as well) to keep studying! Learn how the "black hat" are doing their dirty activities by reading forums.
A good way to be always updated is by creating a Google Alerts, which is a Google tool to be able to have Google posting you with a periodicity you may specify, articles related to a selected topic.
The Security world is made of several "chapters" such as Physical Security, Network Security, System Security...
Every Security Expert should have a basic knowledge of all the topics and be expert on a few ! So you should study the training material related to some entry level Security certification such as CompTIA Security+ or Certified Ethical Hacker.

Conclusion

Continuous studying and practice practice practice!!
Don't do dummy things such as trying the available tools without authorization against Networks and Systems you don't own!!
Enjoy every moment of the study, share your knowledge and be always positive.

OpenVZ - an alternative to traditional Virtualization

A really interesting solution about virtualization is the OpenVZ Linux Containers ! It is an OS-level virtualization system designed to provide the required isolation and security to run multiple instance of the same OS.

As you can see from the following picture, you need to install your Linux OS, than the OpenVZ applications. Using particular features of the Linux Kernel, OpenVZ let you create different containers (VPS or Virtual Private Server) each one with an instance of a Linux OS (you can choose between different templates).


Performances of this solution against the old "machine-based" can be as low as 1-3%.

OpenVZ work under different Linux distribution (mainly based upon RedHat, such as CentOS or Fedora). You can find a good "Quick Installation Guide" on CentOS following this link.

If you need more information...
OpenVZ Linux Container